Tampilkan postingan dengan label popcorn. Tampilkan semua postingan

Senin, 16 Mei 2016

Purple tomatillo


Tomatillo flowers and fruit beginning to ripen


Tomatillo (Physalis ixocarpa) are another vegetable which comes out of South America.  Just like a tomato, eggplant or pumpkin technically speaking it is the fruit of the tomatillo that we eat.  The fruits of the tomatillo are enclosed in a papery husk which I think is part of their charm.  Sometimes people call the tomatillo a "husk tomato".

Apparently the Aztecs domesticated the tomatillo prior to the year 800 BC.  After the Spanish conquistadors went to South America they returned with most of the vegetables we eat today.  Both tomatoes and tomatilloes were brought with them, they are similar looking fruits with similar sounding names that were commonly shortened by Europeans.  Due to this there is a lot of confusion regarding historical manuscripts if they were referring to tomatoes, tomatilloes or some other vegetable.  Regardless we know that they were one of the first vegetables brought back by the Spanish in the 1500s.
Skeletonised tomatillo husk - I dont know what causes this but it is beautiful

For some reason the tomatillo never really took off outside of its home range.  Other vegetables which were discovered at the same time such as tomato, potato, beans, corn, pumpkin, squash, chilli etc now form the mainstay of our vegetable diet.  I honestly do not know why the tomatillo never gained favor as tomatilloes grow like crazy suffering no real pests or diseases, they produce huge amounts of fruit that is simple to harvest, it is simple to save seeds from tomatilloes, and they look kind of cool.  The paper husk (technically a calyx) that surrounds each fruit seems to prevent fruit fly, slugs and most other pests from damaging any fruit.  They are so productive that I have even heard and read in many places that 2 or 3 plants will provide more than enough tomatilloes for a family!

The texture is difficult to describe, kind of like an under ripe spongy tomato, perhaps that is not a great description, it is pretty cool.  They kind of taste similar to a tomato in some ways, but have a kind of citrus taste in there too.  When cooked they take on more of a citrus taste.  They are difficult to describe.  I am told that they are the main ingredient in salsa verde.  They can also be cut and put into salds, salsas or pureed into guacamole or gazpacho or used to flavor rice.  I have also heard of them being used to tenderise red meat.


 I have grown some green and yellow/green tomatilloes in the past and they were good but this time I wanted to grow some nice looking purple tomatilloes.  The plants grew well for me and flowered like crazy.  Each plant was covered in masses of yellow flowers but none of them were setting fruit.  I dont know why this is but some people say that their plants flower well but nothing ever comes of it, perhaps they remove the plant too soon and are not patient enough.  I have also heard that you need at least two plants to cross pollinate each other, I have never grown less than that so cant really comment.  These plants will cross pollinate with other varieties of tomatillo pretty easily so if you grow more than one type please take care if saving seeds.

After weeks of nice yellow flowers that did nothing I started to consider puling out the plants and then the first fruit began to form, then seemingly overnight I had hundreds of fruits forming!  The size of the fruit ranged quite dramatically on each plant, small ones in the beginning of the season and larger ones as the season progressed.  I have seen people on ebay selling seeds of "giant tomailloes", mine were reaching that size towards the end of their run.  They produced a huge amount of fruit in the end but they were not as dark purple as I had hoped.  Some were green, some were light purple, some were only purple where the sun hit the fruit, some had a mix of both on the one plant.  They all look really cool.  They kept on producing lots of fruit right until the frost killed them.

Tomatillo fruit, the paper husks are beginning to split open and show the fruit inside

I usually harvest the fruit after it falls from the plant by itself, the husk protects the fruit from damage so they can stay on the ground for a few days before I get to them if need be.  Some people harvest them earlier and I am told it does not affect the taste at all.  The one thing I have been warned is not to pick them before the fruit finishes filling out the husk otherwise it wont be ripe and apparently does not taste terrific.  

They store best when left in their husk, most people store them in the fridge but they can last a while on the bench or in the pantry.  When it is time to eat them the husk needs to be removed and the fruit will be a little sticky, I find that it is simple to wash this off.

Being closely related to tomatoes and potatoes and considering how simple it is to take cuttings from those I wondered how easy it would be to take a cutting from a tomatillo.  I cut a small branch off and put it in a cup of water on the kitchen windowsil.  In two days that small cutting had sprouted roots and a few days later I was able to plant it. This plant is still slowly growing, flowering and setting fruit as it is in a pot out of the frost.

I do sell seeds of the "purple"  tomatilloes on my for sale page.  If you do grow them please grow more than one plant so that you will have adequate pollination but resist the temptation to grow too many.  They are so productive that 2 or 3 plants easily provides more than enough tomatilloes for the family.
 
Read More..

Senin, 09 Mei 2016

Mini blue popcorn


Mini blue popcorn is heaps of fun to grow.  The plants take up little room, produce cute little cobs, and the popcorn from them is fantastic.

I first grew mini blue popcorn when I was a teenager as an ornamental corn that was also fed to the chickens and things.  At that time I dont think we ever popped it, I am not sure if I had even eaten pop corn back then.  After I moved out of home no vegetables were grown and what was left of the seed disappeared over the years.

After moving here I decided to track some mini blue popcorn down again and grow it with my kids.  My littlest boy Nanuq is particularly fond of corn and likes the colour blue.  He was very excited to help me plant some blue popcorn to grow.

I started with a good number of seed, then carefully picked through it to select the best seeds both in colour and conformation to plant.  I ended up planting a decent number of seeds, being a mini corn allows it to be fit into small spaces so I was able to grow more plants in the area.
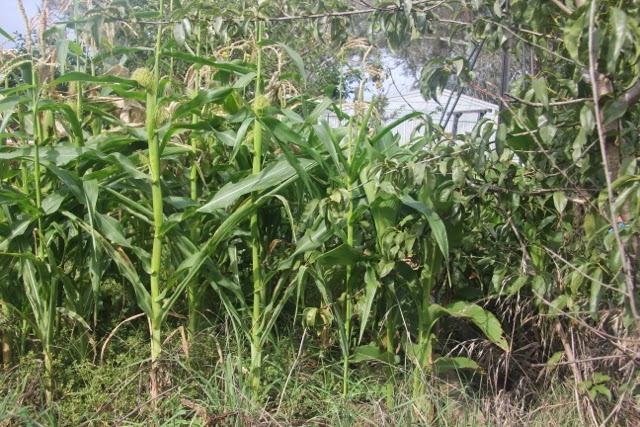
mini blue popcorn starting to form tassels, stalks are shorter on the right hand side

The plants grew well, most germinated and those that didnt (or were eaten by birds and things) were replanted with extra seeds.  Being a small variety of corn they only reached below chest height.  Completely different to the 12 foot tall Giant Inca white corn which was grown in the same vegetable garden.  Only a few of the mini blue popcorn plants were multi stemmed which is unfortunate as multi stemmed plants tend to produce more cobs.  The plants had to contend with grass and other weeds as well as QLD arrowroot and fruit tree roots, the stalks were noticeably shorter as they got closer to the tree.

Notice the brown silk forming on the cobs from the left hand plant
As the season progressed it was noticeable that almost every stalk produced several cobs.  Some produced more than others, these are the plants that were worth saving seed from as more cobs means more popcorn per plant.  Some plants only produces 2 or 3 cobs, I did not save seeds from these.

When the season was over I got Nanuq to help me collect the little cobs, it was a bunch of fun.  All of the kids helped me to remove the sheaths in a process that we call "pass the parcel" then the little cobs were hung up to dry completely.  The cobs looked great, most were well filled out and the colour was good.
mini blue popcorn cob, almost dry enough to shuck

After the cobs were dry Nanuq and I shucked the cobs.  He worked for a long time shucking quite a lot of cobs with his little hands, he asked that I payed him.  When I asked what he wanted to be payed (I meant "how much") he told me he wanted corn seeds.  That little guy sure loves his corn seeds.
mini blue popcorn cobs

When all was said and done we ended up with a decent number of cobs from multi stemmed plants or plants that produced many cobs.  We decided to pop some and see what they were like.  To make the results mean a bit more we also popped some popcorn from the shops as a comparison.
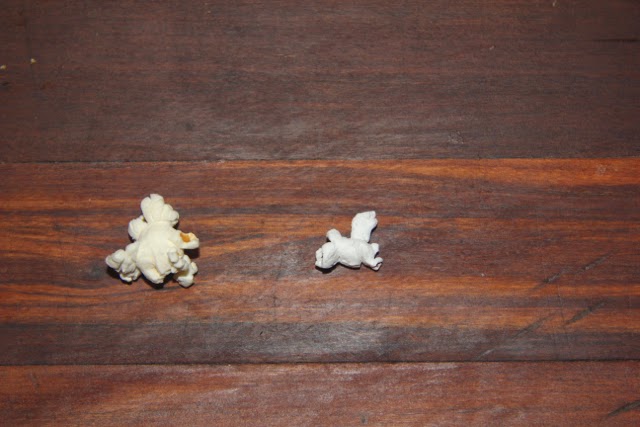
Regular popcorn on the left, mini blue popcorn on the right.  Note how white it is

The mini blue popcorn has small seeds, these seeds pop smaller than regular popcorn as can be seen in the picture above.  Regular yellow popcorn pops white, the mini blue popcorn pops extra white.  I dont know what is expected in popcorn but I like the little super white popcorn.

With the store bough popcorn between 85 - 90% of the kernels popped, my glass bead corn is almost popping that well.  Every time we have popped the mini blue popcorn 100% of the kernels have popped.  We are yet to have a single seed from the mini blue popcorn that has not popped.  Clearly this variety has been bred well and whoever owned it before me had maintained and selected it well.

The mini blue popcorn tastes just like regular popcorn but feels different in your mouth.  It feels less dense, perhaps fluffier, it is difficult to explain.  I do not particularly enjoy eating popcorn very often, I really grow it for the kids, but I do like this popcorn.  I think I dislike the density of regular popcorn and the fact that little bits get stuck between my teeth.  I find this mini blue popcorn is nicer to eat.

I do sell seeds from the mini blue popcorn, they are listed on my for sale page along with the other seeds and perennial vegetables that I have for sale.

Read More..

Senin, 02 Mei 2016

Yacon Water Kefir


I have had milk kefir grains for some time now, the kids love it, I like it but find it a bit too sour to drink by itself, and Tracey dislikes the taste of it.  Kefir is good for you so I wanted to try water kefir.  Perhaps that would be a way for the kids to get more of the kefir goodness into their diet.

Recently we obtained some water kefir grains.  Water kefir is different from milk kefir, it is still very good for you though.  The younger kids do not like water kefir all that much (mostly because it is a bit bubbly), Igloo loves it, I love it and Tracey thinks it is ok. 

Kefir
Both types of kefir contain live and beneficial probiotics.  Basically they consist of "good" bacteria, yeasts and other microbes. These good microbes are eaten by you and some will colonise in your digestive tract and continue to provide you with benefits long after you have finished consuming the kefir.  There are many recipes for water kefir on the internet but we have been mostly following the one that came with the grains.

Yacon
Yacon contains inulin and other sugars which are not digestible by humans.  Yacon is considered a prebiotic, this means that it contains things that feed the good bacteria etc in your digestive system which help to keep you healthy.  Yacon tubers also taste great, it is a vegetable that is eaten like a fruit and is loved by kids.  Yacon is my favourite vegetable.

Kefir & Yacon?
If water kefir contains probiotics, and yacon contains prebiotics which feed the probiotics, then it made me wonder if I could culture water kefir on yacon and leave out all of the other things.  After internet searching I found many people who claimed water kefir flourished when using yacon syrup instead of sugar.  Some people culture water kefir only on water and sugar, many of these people were the ones saying that the yacon syrup was great.

The only problem is that I do not have access to yacon syrup, I grow yacon plants and have access to the delicious yacon roots.  I do not know how to make the syrup and I do not intend to find out, I certainly have no intention of ever buying yacon syrup!  Nowhere on the internet seems to mention anything about yacon root (which I grow) being used in water kefir.  There is no one saying that they have tried this and failed or succeeded, someone needs to try this and let people know if it works or not.  That is why I am writing this post.
Yacon kefir - all the bubbles are gone because I carried the jar outside to take a picture

This is almost certainly not the best way to do this, but it is my first attempt so I will write what I did, and what I think should be done differently to make it better.  At some point in the future I may write another post and say what I changed and how it worked (or did not work).


Yacon Water Kefir

Ingredients:
1 small peeled yacon root (about the size of my thumb, perhaps a bit larger)
1 small peeled and grated yacon root (similar size to above)
1/2 cup water kefir grains
4 cups water

Method
1) add water kefir grains and water to a jar
2) squeeze the liquid out of the grated yacon root.  I put a strainer above the jar and squeezed above this so that the liquid would go in but not the solids.  Discard the squeezed and grated yacon
3) add the peeled yacon to the jar of liquid
4) wait 2 days for the kefir to do its thing.  I do not put a lid on the jar but you need some way to prevent insects and dust from entering
5) remove the yacon root, remove the kefir grains, drink the liquid.  Pretty simple


Even before the 2 days were up I noticed a few things.  Firstly, grated yacon is delicious!  I think it would go well in a salad being grated like this.  Secondly the kefir was bubbling a bit, this tends to indicate that the grains are working well.  If the jar had a lid we may have had issues with the pressure.


What does it taste like, Would I do this again

It tastes alright, but nothing to write home about.  It is similar to how water kefir tastes when it is made on sugar rather than adding any kind of fruit.  The water tastes like it is bubbling, even when it is not, other than that it does not have a strong taste.  I could barely taste the yacon, if I did not know that yacon was in there I would not have guessed it.  Kind of like soda water.

I dont think I will do this again, or if I do I will change things around and perhaps add some limes.  I love how water kefir normally turns out and found this yacon kefir to be less than exciting.  I also prefer to eat yacon normally rather than to eat it after it has been kefired.  The water kefir grains did not multiply as much as I had hoped.  They did multiply a bit, and the grains had been in the refrigerator for a week which generally means that they wont multiply a lot, but I had high hopes.  The water kefir grains have been multiplying slowly lately and I had hoped that the natural sugars in yacon would fix this, apparently we just have to wait for the weather to change.

Interestingly enough, the peeled yacon root also tasted like it was bubbling after it is removed from the completed kefir.  The kids thought that eating the yacon was fun as it did not taste much like yacon, it tasted like it was bubbling.

I also found it interesting that yacon normally discolours reasonably quickly after it has been peeled, but even after two days in the kefir the peeled yacon root looked much the same as when I put it in the jar.


What I would do differently

Yacon kefir tastes ok, but not great.  Adding some kind of fruit or berries or something may have made it much nicer.  Adding some sort of juice or something to the finished yacon kefir certainly makes it taste great.  I dont know, I may try a few different things and then write a post about them.


Where to get yacon and kefir grains

I sell yacon crowns on my for sale page over winter.  I may offer water kefir grains and milk kefir grains for sale, if I do they will be listed on the for sale page too.  Kefir grains sometimes reproduce slowly, other times quite fast, so you may need to contact me to see if they are available.  I also sell a few other organic perennial vegetables and some organic heirloom vegetable seeds.

Read More..